


Keyboard slide 18 1/2" w x 45" L Approx. 24 3/8" to bottom
Hutch 47" L x 11 1/4"
Bottom supports 20" w x 31 1/8" L
Tools: Drill, Circular Saw, Orbit Sander, Pull saw, Hammer, Measuring tape, Square tool
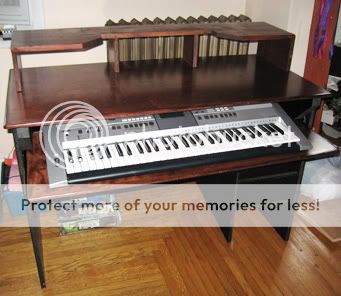
I decided to build this after getting some mixing monitors that would not fit on my normal desk. I looked at a few designs and seen some audio desks on youtube. But I wanted it to still be small and also have the shelf space of my old desk. Since those videos are fairly new I thought I would share my project also, especially for those who don't have the space for a full size recording desk.
I later had to modify the hutch so my Imac could fit deeper. A lot of designs have the monitor on top of the hutch but I don't like the idea of having it so far away. I also like the look of a one piece hutch instead of two separate stands which are in other designs. To do this I had to make a plunge cut which I was a little nervous but it turned out okay. If the middle supports look oddly placed, it's because I didn't want to put more screw holes in the wood. Either way they still work.
I just was looking to make something functional while recycling some board I already had which were used for the bottom. I then got some birch ply for the top and stained it red oak. I wanted rounded edges so I added some trim also. I suggest putting three coats of poly if you do not have a mouse pad. The desks in the videos use wood flooring. If you do not want to wait for the poly to cure (especially if you work in a small room, it can be quite toxic). I would opt for the wood flooring. You can also ad trim to match if your picky like me.
Let me add that this is for holding a minimal amount of equipment for the enthusiast and not some heavy duty piece of furniture that your thinking of dancing on too. I looked at some designs and they can be about $300. A Home store can even cut the wood for you for a few cents more. The materials cost just over $100 because of the wood I chose but you can certainly go cheaper.
Thanks to CJD for the original build
...to Robfalcon501 for specs and modifications